Wednesday, January 27, 2016

Navy Bean Potato and Kale Soup


Who doesn't love soup on these cold days?  


I love soups.  Since becoming plant-based 1.5 yrs ago, we eat a lot of soups.  This is one of my personal favorites.  It's made in my Instant Pot.  It's a pressure cooker, slow cooker, ricer and yogurt maker, all in one.  I got mine from Amazon.


NAVY BEAN, POTATO AND KALE SOUP

2 cups dry navy bean, rinsed
water
2 carrots, sliced
2 celery stalks, sliced
1 large onion, chopped
4 medium potatoes, cut small
1 can fire roasted tomatoes
2 cups kale, chopped
1-2 T dry parsley
1 t celery seeds
1/4 t. red pepper flakes
2 bay leaves
Salt and Pepper to taste
*see note

Instructions:

Add rinsed dry navy beans into the Instant Pot.  Fill pot about 1/2 full with water.  Set manually to pressure for 15 minutes.  Do a quick release.  Add the rest of the ingredients and bring to pressure again for 5 minutes.  Natural release for 10 minutes and then do a quick release..

Enjoy!!!

Note:
If you don't have a pressure cooker, you can always cook this on your stove top.  Add everything except the potatoes and kale and cook until the navy beans are tender. Add potatoes and kale and cook an additional 20 minutes until the potatoes are tender.  

Sunday, May 3, 2015

Mirror Mirror On The Wall


It's been quite some time since I posted a DIY project.  This one turned out better than I had expected and wanted to share with you.


This mirror from West Elm was my inspiration.  I love the frilly edges.  


I had one of those 3 legged tables from way back when.  The ones you put the skirt on.


I removed the legs and hardware off the bottom.  I then primed and painted it white.  I purchased a pack of premium cardstock from Office Depot.  It's Creative Collection and comes with four metallic colors.  White gold, champagne pearl, white silver and chalice silver.  

I cut them into strips with a point on the ends.  Then I got busy gluing rows of paper to my table base.  I first glued the lightest paper and then mixed the other three colors for variety.  I ended up doing three rows.  


I cut a ring from foam board to make a frame for the 8" mirror.  I padded the foam and then added fabric and glued it down on the base.  Then I added the mirror.  I curled the edges of the paper strips to give it some dimension.  Measures 24".

I love mirrors.  I especially love the sunburst mirrors.  What do you think?  


Visit the following links for more great projects.

Linking to:

http://diyshowoff.com/2015/05/03/that-diy-party-40/

http://www.ourminifamily.com/2015/05/our-mini-linky-party-week-17.html#more

http://www.ishouldbemoppingthefloor.com/2015/05/inspiration-monday.html#more

http://www.dwellings-theheartofyourhome.com/2015/05/amaze-me-monday-109.html#more

http://www.kathewithane.com/2015/05/youre-gonna-love-itanything-goes.html

http://cornerstoneconfessions.com/2015/05/titus-2-tuesday-154.html

http://linda-coastalcharm.blogspot.com/2015/05/show-and-share-no260.html#more

http://www.notjustahousewife.net/2015/05/may-linky-party.html

http://thewinthropchronicles.com/2015/05/share-it-link-party-165/

http://memoriesbythemile.com/2015/05/04/treasure-box-tuesday-70/

http://www.sugarbeecrafts.com/2015/05/show-and-tell-link-party-time-8.html

http://www.thriftydecorchick.com/

Monday, July 22, 2013

Drab to Fab Chair


I am redesigning my master bedroom.  I had a big over-sized chair which was comfy but the color was not working.  I was thrifting one weekend and spotted this chair.  It was the right size.  I have never reupholstered anything other than an occasional chair seat.  I hesitated buying it.  My daughter finally talked me into it.  She has more confidence in me than I did.  It was a steal at $25.00.

Next I searched for fabric.  I didn't want anything too busy.  I am decorating in blue and white with yellow as my accent color, but that could change.  I wanted something that would blend in, in case I change my mind about the yellow.  I found a nice fabric in navy and white.  I might go with just blues, so this worked out perfectly.

I started by taking lots of pictures when stripping the chair.  The hardest part was removing the gazillion staples.  My husband was out of town that week, so it was left to little ole me.  It took me days to finally get the chair ready for the new fabric.

It actually was a lot easier than I thought.  I was really worried about making the cushion cover.  I took the old cover apart and used it as a pattern.  It was my first attempt at piping.  I wasn't able to salvage the old zipper.  When finished, I added the foam back into the cushion cover, holding my breath the entire time.  It fit!!!

Then I made double welt trim.  This was another first for me.  I did purchase the foot needed for my machine.  I found plenty of tutorials on how to make double welt with a regular foot, but had tried it once and it didn't look too great, so decided to buy the right attachment.  It was well worth the investment.

I also painted the chair white.  I am so glad I bit the bullet and listened to my daughter.

I'm so happy with how the chair turned out.


Until next time........


Linking to:  

http://www.frenchcountrycottage.blogspot.com
http://www.finecraftguild.com/party-76/
http://thededicatedhouse.blogspot.com
http://www.trulylovelyblog.net
http://www.lizmarieblog.com
http://www.serenitynowblog.com
http://www.niftythriftythings.com
http://www.ifitsnotbaroquedesignblog.blogspot.com/
http://www.craft-o-maniac.com
http://rainonatinroof.com
http://diybydesign.blogspot.com
http://diyshowoff.com

Friday, August 31, 2012

Craft Room/Guest Room Reveal


SPECIAL NOTE:  I have to warn you, this post is very picture intense.

I have had a very busy month.  My goal this summer was to clean the guest room.  It was quite a task, but I did it.

Let me start by telling you I was starting to feel like a hoarder.  I have so much *stuff*.  Things I didn't need, didn't use, didn't want.  It was overwhelming.  I would look in the room and the mess and just turn around and leave.  What was I going to do with this mess?  Where would I even start?


I am so ashamed that I let this room get in this condition.  It was a catch-all.

We live in KY during the spring/summer months.  In October we will go to Florida.  I decided to take everything I didn't want to Florida to sell in a garage sale.  I would have had a sale here in Ky, but I live in a rural area and not an ideal place to have a garage sale.  So, I have a ton of tubs filled with goodies when we make our trip to FL.

Once I got the room cleaned out, I started the task of making it presentable.  I decided to use this room for my crafts also.  I painted the room a soft robins egg blue/aqua.  I ordered fabric and made my curtains.  Love them!!!  If someone knows how to take a picture in front of a window without washing out the color, please let me know.


This is the true color of my new curtains.


 I found a pretty comforter in the colors I was using.   I made a few pillows for the bed with a little pop of pink.


 I prefer a gathered bed skirt.  I didn't want white, so I made my own.  Love it!!!


Next I painted a lamp I already had and covered the shade.


I was looking for art work to hang above the headboard and found a pair of watercolors.  Loved them but not the price.  Being a DIY kinda gal, I painted my own.  I have used acrylics and oils but never watercolors.    Found a pair of frames at the thrift shop and painted them white. Then I got out my watercolors and attempted to duplicate the prints I loved.   I'm real happy how they turned out.


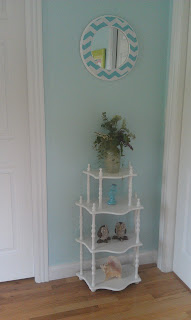
Next, I had a round mirror that had roses painted on the frame.  That was not going to work so I primed the frame.  I found some chevron contact paper at TJ Maxx and added it to the frame. Much better.


Now on to the other side of the room.  I do a lot of crafts.  I love to sew and paint.  I put a lot of my fabrics in the armoir.  I found a pair of vintage owls and painted them pink!!


My craft table holds my sewing machine.  I made a cute cover for it when I'm not using it.  My husband helped me hang some shelves to hold all my crafts.  I covered boxes, bins and containers to better organize everything.  What a change.  I added a floral wall decal over my table.


I had a wooden plate that was put aside for the garage sale, and then pulled it out to make this cute button.


Can't forget my computer chair.  It was an ugly black.  I found this cute fabric at Hobby Lobby.  Such an improvement.


I still have a few more accessories to find.  I need a rug next to the bed.

I am so happy to finally have this room cleaned out and back to being what it's suppose to be.  I have a space for guests.  I have a space to do my crafting and sewing.  I'm a happy camper.

till next time...


Linking to:  shabbynest - stuff-and-nonsense - flamingotoes
 mygirlishwhims - polkadotsonparade - atthepicketfence
 blissfulanddomestic - linda-coastalcharm - 733blog
 sew-much-ado - craftjunkietoo - delicateconstruction
 positivelysplendid - ivyandelephants - pincushioncreations
trulylovelyblog - bacontimewiththehungryhypo - practicallyfunctional
 familyhomeandlife - alittleknickknack - chiconashoestringdecorating
 finecraftguild - adornedfromabove  - littlebeckyhomecky
 serenitynowblog - niftythriftythingsfrommyfrontporchtoyours
michellelunt - thethriftygroove - whipperberry
lizmarieblog - simplydesigning - mysimplehomelife
happyhourprojects - herecomesthesun-kelly - gingersnapcrafts
rootedinthyme - shabbyartboutique - craft-o-maniac
thegingerbreadblog - beneathmyheart - destinationcraft
funkyjunkinteriors - youngancrafty - 504main
itsoverflowing - tatertotsandjello - onecreativemommy
petiteherminety - cherishedtreasures-terry - linesacross
iheartnaptime - ishouldbemoppingthefloor
thededicatedhouse - thriftydecorchick - saynotsweetanne
claimingourspace - ourdelightfulhome - craftytexasgirls
cherishedbliss - craftyconfessions - sugarbeecrafts
adventuresofadiymom - live-love-laugh-interiordesign
thediydreamer - diybydesign - savvysouthernstyle
thesasselife - thenymelrosefamily - elizabethandco
cornerstoneconfessions - kathewithane - raegunwear
thetrendytreehouse - theartsygirlconnection - domesblissity
thelifeofjenniferdawn - impartinggrace - thrifty101
delightfulorder - theshabbycreekcottage - hubbymademe
seven-alive - bearrabbitbear - madeinaday - 52mantels
twenty-eight-0-five - staceyembracingchange - redouxinteriors

Tuesday, August 7, 2012

Turquoise Table & Mirror


I am loving turquoise these days.  I'm usually not this bold.

My sister-in-law gave me this table when she moved into a smaller space.  Lucky me.  I wish I had a before picture.  It was black with pink flowers.  Not my style at the time.  I originally painted and glazed it a soft sage.  

My daughter is a mini me.  We are a lot alike, but when it comes to decorating, she likes bold and bright.  I tend to lean more towards soft muted shades.

She was redecorating her living room and had some leftover paint.  I thought about it and thought a little more about it.  Then I thought, what the heck.  Just do it.  So I painted my table this bright turquoise.  I had the antique mirror stashed away in the closet and painted it too.  Wow!! What a difference.  It took on a completely new look.  

It really adds a bright spot to my hallway.  


till next time....


Sunday, August 5, 2012

Longest Yard Sale 2012

I'm sure every one has heard of the longest yard sale.  They did a few segments on HGTV.  It's on Rt. 127 and extends from Michigan through Alabama.  Rt. 127 is the main route passing through our town.

We have a lot of vendors from out of town that set up throughout the city.  I used to do the yard sale for 3 days, but it seems to get hotter and hotter each year.  It was close to 100 this year and just too hot for me.  I did manage to hit a few places in town.

I'd like to share a few pictures I took.  My daughter snapped a few on her way into work.


So many things to look at.  The only drawback was the heat.

So, what did I buy?  I am really into owls at the moment.  I found quite a few vintage owls and scooped them up for a great price.  Can't wait to give them a redo, when it cools down outside.

Here are my sweet owls..........


until next time...


Friday, July 27, 2012

Mellow Yellow

Do you have a piece of furniture that has a special meaning to you?

My dad had a stroke in 1995.  My sister and I took turns caring for him.  Yesterday was the 7 year anniversary of his passing.

My kitchen chairs are on wheels.  Too dangerous for my dad to try and sit down.  We found a set of chairs and I took one and my sis kept one for her house.  They had this ugly brown velvet on the seat cushion.

After my dad passed I put the chair away.  Recently I painted my kitchen a sunny yellow.  I needed a chair for the desk area and remembered the ugly chair my dad used for so many years.


This is what it looked like before I gave it a makeover.  I had forgotten to take a before picture and my sis was kind enough to snap a picture of her chair.  

I started out priming the chair.  I used a primer with stain blocker, applying 2 coats for good coverage.  I wanted something nice and bright.  Since my kitchen was yellow I thought it would be a good choice for the chair.  I found this cute fabric with the colors in my kitchen.   


I love how my chair turned out.  I think of my dad every time I look at it and I think he would have loved it too.

until next time.....


Linking to:

blissfulbucketlist - 504main - serenitynow - trulylovely
chiconashoestringdecorating - alittleknickknack
delicateconstruction - craftjunkietoo - blissfulanddomestic
thegingerbreadblog - countrymommacooks - funkyjunkinteriors
saynotsweetanne - thededicatedhouse

Sunday, July 22, 2012

Heart Quilt Finished!!!


You never know what you'll find while cleaning and organizing.  I decided to tackle my closet.  I have a walk-in closet that is so full of tubs, etc.  that I can barely walk in it.

While going through the tubs, I found 3 quilts that I needed to finish.  Two of them only needed the border quilted and then the binding added.  Doesn't sound like a lot of work, but if you quilt, you know it takes time.

I never machine quilt.    I use my machine to piece the quilt but all the quilting is done by hand.  It takes forever and a day to finish a quilt.  It took me a total of 4 days just to finish hand-quilting the border and then  add the binding.  Another process done by hand stitching.

I saw this pattern on Simply Quilts on HGTV.  It's been off the air for a few years and that is when I first started making this quilt.  So, I'm thinking maybe 3 or 4 yrs ago.

I am so happy to finally finish this.  Here are some close-ups of the embroidered leaves and the hand quilting.  The quilt is heavily hand-quilted with circles of inter-twining hearts.  


I am putting this one away for safe keeping.

till next time...


Linking to the following parties.....
My 1929 Charmer -  ishouldbemoppingthefloor - ourdelightfulhome
niftythriftythings - destinationcraft - craft-o-maniac
http://petitehermine.blogspot.com - Kathy'sQuilts
iheartnaptime - debtfreemommy - TheDedicatedHouse
creatingreallyawesomefreethings - sumossweetstuff
keepingitsimplecrafts - linesacross - diyhshp
pinkapotamus - jembellish - saynotsweetanne
youaretalkingtoomuch - sewchatty - alderberryhill
blackberryvine - adventuresofadiymom - sugarbeecrafts
thecreativeitchboutique - craftyconfessions - thekurtzcorner
adornedfromabove - claimingourspace

Wednesday, July 18, 2012

Ribbons Finally Organized


How do we accumulate so many spools of ribbon?  While trying to organize my craft room, one of my concerns was how to get a grip on my growing mound of ribbons.


See what I mean?

I browsed pinterest hoping to find a solution.  I had too many spools to use a paper towel holder.  I would need at least 10-20 of those.  Then I would be faced with another dilema.  

I have a long curtain rod (extends to 102") I wasn't using.  I nixed that idea when I realized how wide it would need to extend to hold all this ribbon.

The spools were the problem.  They take up a lot of room.  They had to go.


I took some card stock and made these holders.  

It took me a full day to transfer all the ribbons to the cards.  Didn't realize it would take so long, but then again, I had a lot of ribbon.


I found the perfect box at TJ Maxx.  I was really surprised it held all the ribbons and I still have room for a few more.  Yes, I will probably buy more ribbon.  You can never have enough ribbon, right?  


I love the box, but not so much the design on the lid.  No problem.  I covered it with this sweet paper. 

I'm still amazed that I was able to get all that ribbon into this box.  I was stressing about getting it under control.  So, how do you organize your ribbon?

till next time...